Heather is a seasoned
Pinterest marketing expert & educator using the platform since you could reach the bottom of the feed - 2010.
About Heather Farris >
ThriveCart Learn+ for Selling Digital Products & Memberships
June 26, 2023
I recently migrated all of my courses including my one off digital products like The Pinterest System & my membership Pin Profit Academy to ThriveCart Learn. ThriveCart is a great platform for selling digital products and now with the integration of Learn you can host a full course platform without spending money to do so monthly.
ThriveCart Learn+ allows even further ability to control and bundle your courses and create memberships for sale.
I’m going to show you how easy it is for a one-time cost of $885 for a lifetime license can allow you to start and scale your digital product business.
You may want to read my full ThriveCart Review before diving in.
*This post contains affiliate links.
Can you host a membership on ThriveCart?
Yes, the simple answer is absolutely. With your ThriveCart standard subscription you get Learn which gives you almost everything you may need to host your membership. There are only a few differences between Learn & Learn+.
ThriveCart Learn vs ThriveCart Learn Plus
ThriveCart Learn gives you a course hosting platform. With Learn you can create and host courses. I created a free resource library as well as my free offers and paid offers. This means people can get my free email list offers and still get added to my email list.
I talked about this in depth on my ThriveCart Review blog post.
The only differences between Learn is the following Learn+ only features:
- Team members access
- Course bundles
- Student tagging (email marketing feature)
- Importing students
Does ThriveCart Pro include Learn+?
No, but ThriveCart Pro and Standard include Learn.
ThriveCart Learn+ Pricing
ThriveCart Learn+ is an additional $195 for a lifetime add-on. I think this is 100% worth investing in further if you plan to sell memberships without having to add people to each individual course in the product setup phase.
Make it easier on yourself and just get Learn+. Especially if you have multiple different brands & you want to host courses out of one account.
Can you create courses on ThriveCart?
Yes, that’s what this entire post is going to tech you… let’s dive in.
Pros of Learn+
- Being able to easily sell courses in bundles
- Importing students from other platforms easily like with your email service provider or via a CSV file.
- How easy it is to drop your new students right into their new courses
- The ease of setting up a course
- Branding your Learn+ dashboards, pages, courses
Cons of Learn+
- No universal brand kit to make customizing courses easily
- No native video hosting so you need a video platform like Vimeo
- No single sign in option for your entire course dashboard
- (To get away from this I create a start here course as a landing page & bundle it into my course sales)
ThriveCart Learn Bundles vs Projects
Projects are required to host your courses within. Think of them as a folder. Your students will not see these.
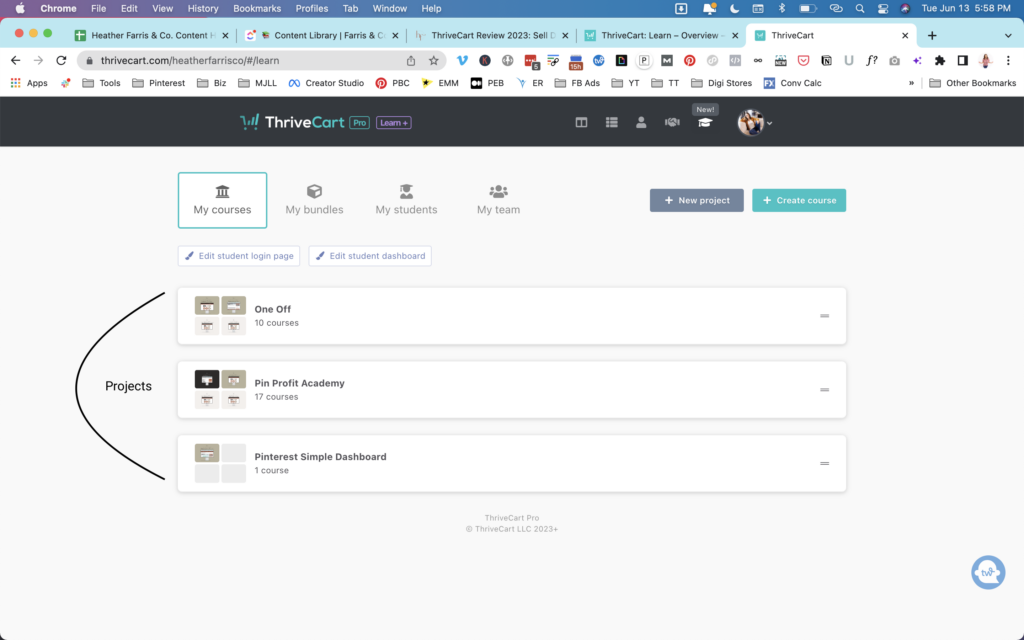
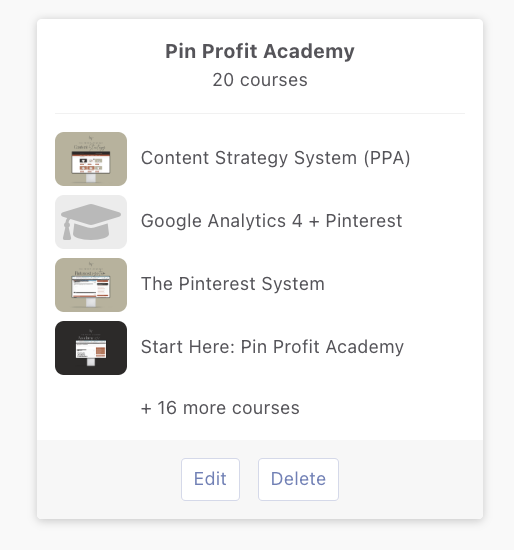
Bundles are bundles of courses you create out of your projects that you will give access to students all at once or dripped out.
I was confused by this at first and ultimately decided to create 1 project for my membership only courses and 1 project for all of my courses I sell as a one-off. Later I will be adding a 3rd project for my travel blog freebies & products.
How to Create Your First Course in ThriveCart Learn
Now that you know the differences in bundles vs projects let’s talk about how to create your first Learn course or digital product.
I don’t just create courses in my Learn dashboard. I’m also hosting my digital products in here to keep it all in one place as well as my free resource library.
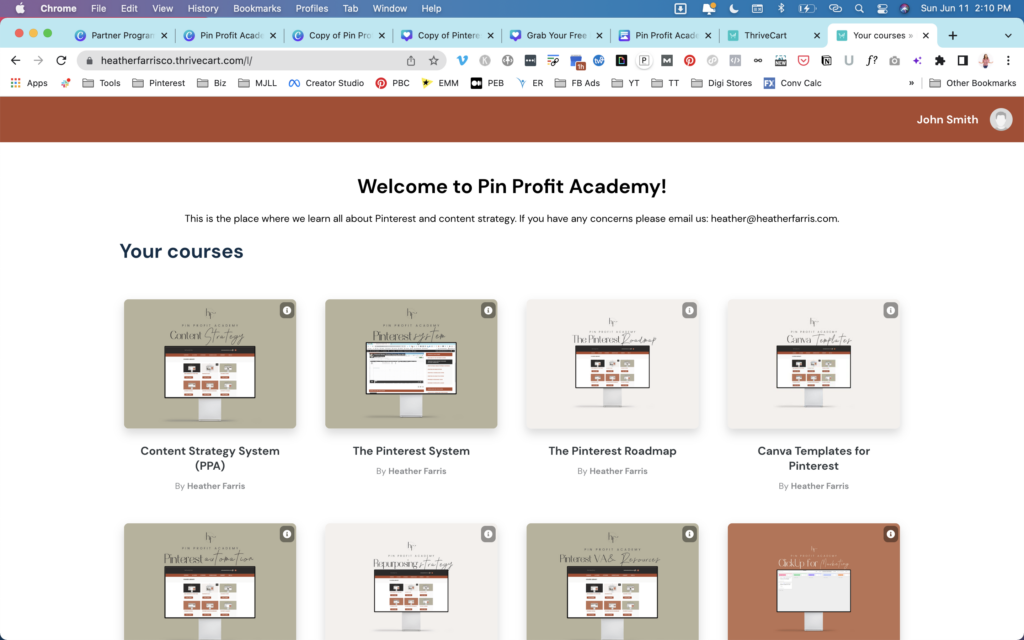
First, start by creating a project. Then create your course and assign it to your project.
Add your course details:
- Name
- Course banner
- Author photo
- Author name
- Course description
- Support email
- Language
- Course layout
Once you have all of this in place you can being inputting all of your course details. I would suggest having your entire course written, filmed and the imagery or video ready to go. Then you can simply copy and paste your course materials into Learn.
The Different Layouts for a ThriveCart Learn Product
Before you setup your courses I would setup a test course just to see the different layouts & what you will want your students to see.
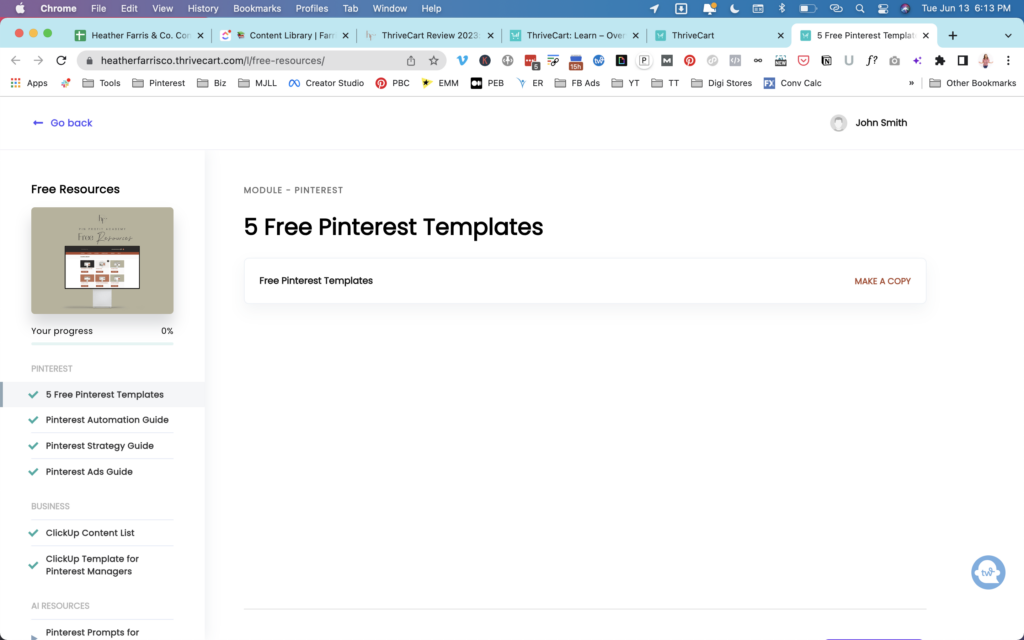
The 3 options are as follows.
- Sidebar
- Grid
- Top menu
I’m personally using the sidebar option for all of my courses currently but may explore the other options later on.
Sidebar
Grid
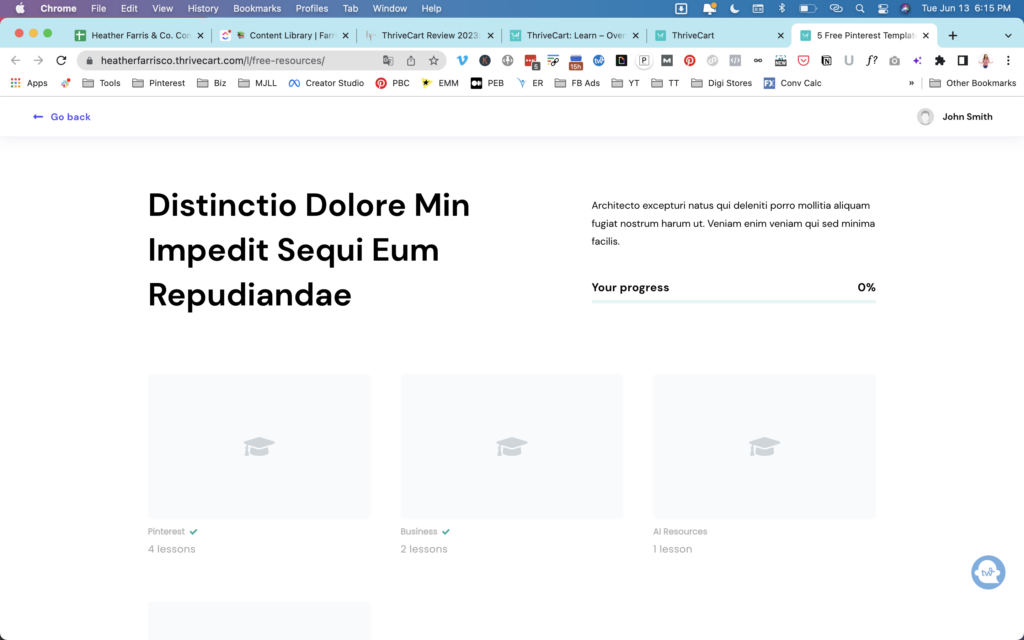
Top menu
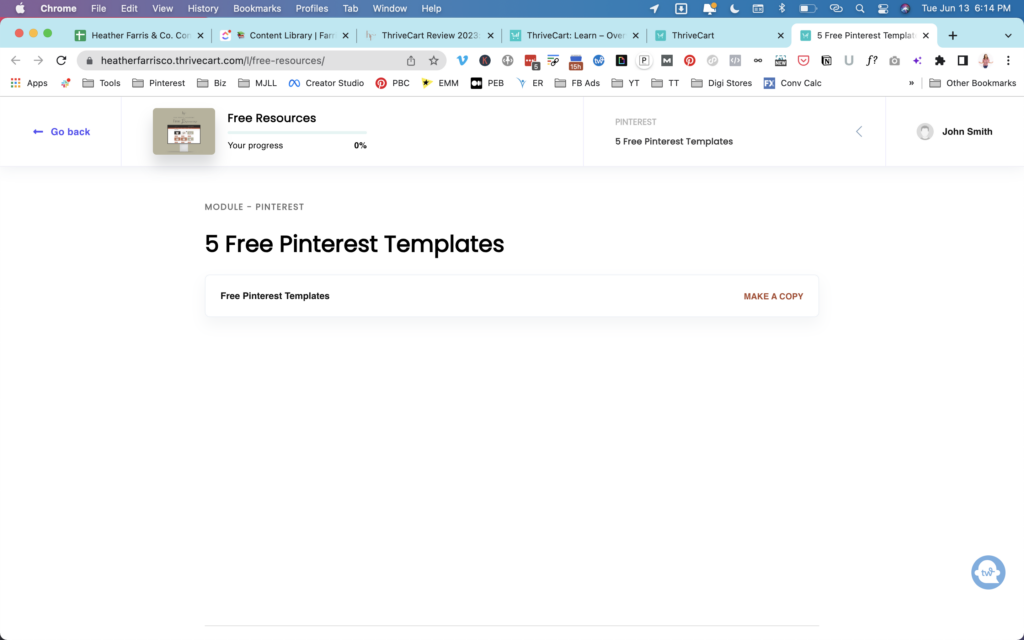
Branding Your Products
One of my biggest complaints is the lack of universal branding in your settings like other tools offer. However you can brand your courses in the settings of each when you create them.
You will create your course then once it’s created you’ll need to change a few settings.
The first section when you create your course is to click into “course options” and customize each of those to your liking.
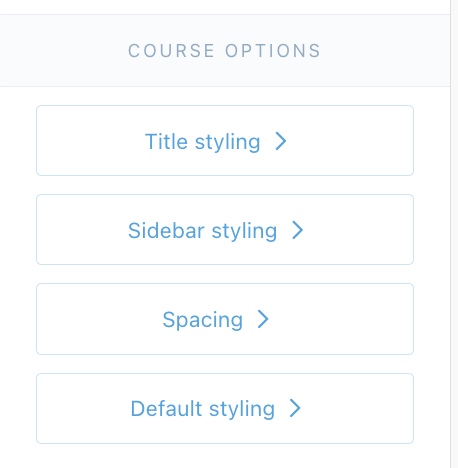
The next section is navigation styling. Unfortunately they do not offer the ability to set defaults for the button color. Every single time it’s a color change you will need to make.

Lastly, you’ll need to edit the button styling.
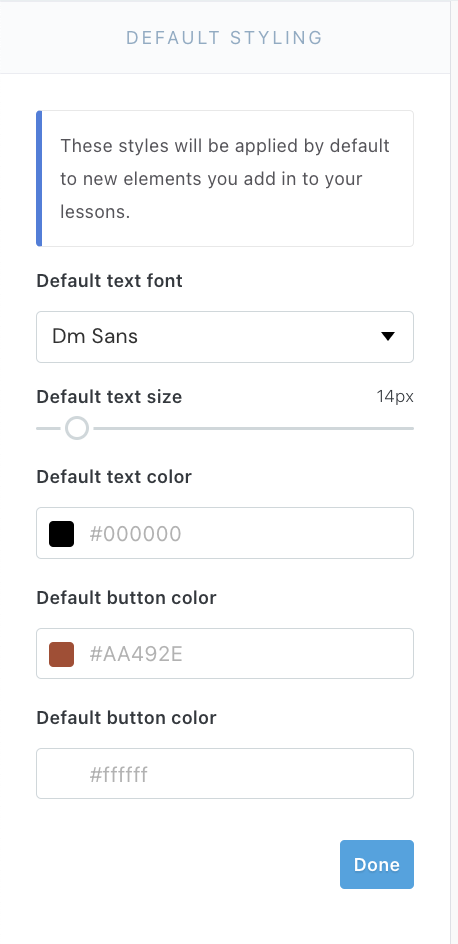
How to Setup Free Offers to Grow Your Email List
I have loaded all of my free offers into ThriveCart and connected them to ConvertKit. These pages are designed for conversions and I’m seeing an average of 58% organic conversion on one of my most popular free offers.
So here’s what you need to do…
Create a product in ThriveCart and set the pricing to $0.00. Go through each page of the setup until you reach the checkout tab. This is where these next steps are going to come in.
Grab my free template here to jumpstart this process.
To build this from scratch follow these steps:
Step 1: In the payment section click “hide section titles”.
Step 2: Add a heading back above your info section
Step 3: Click the email address box and click “customer name enabled”
Step 4: Change your cart flow to a single step
Step 5: Change “choose card icons” to none
Step 6: Adjust your the padding on each element to make it fit your desired placement
Step 7: Customize your copy & imagery
Step 8: Customize your success page
Step 9: Finalize your product setup in the behavior tab.
Step 10: Test your product setup and ensure your free offer is delivered properly.
During this phase you will also need to write the delivery email in your service provider platform. You may also want to write a 3-5 email nurture sequence to deliver even more value to your leads once they are on your list.
I like to customize my nurture sequences to be specific to the lead magnet and go a little deeper. I give them my best stuff and eventually drop my new email subscribers into my membership sales sequence to show them the potential of what they could learn if they were to join my paid community.
How to Setup Your Paid Products in ThriveCart Learn to Sell
We talked about how to setup a free product but let’s chat about how to setup a paid product. There are more steps to this option than the free version because you need to decide on pricing, payment plans, etc.
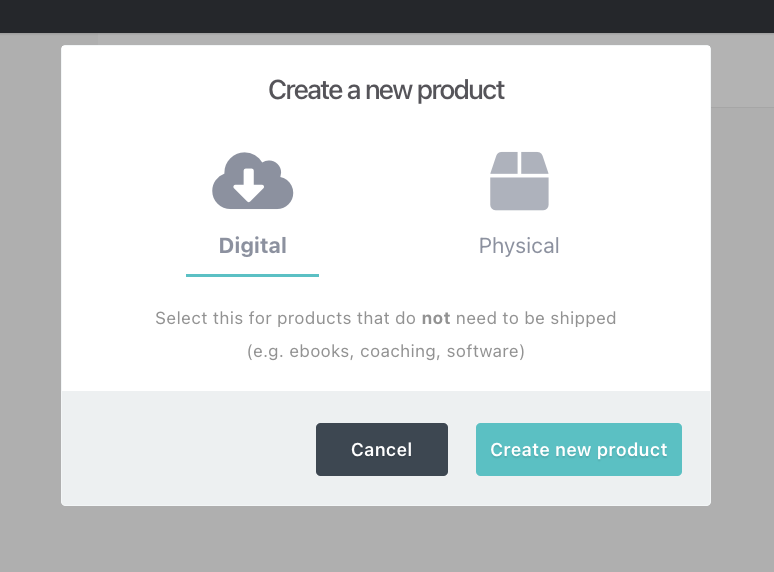
First you need to create your product and choose digital or physical.
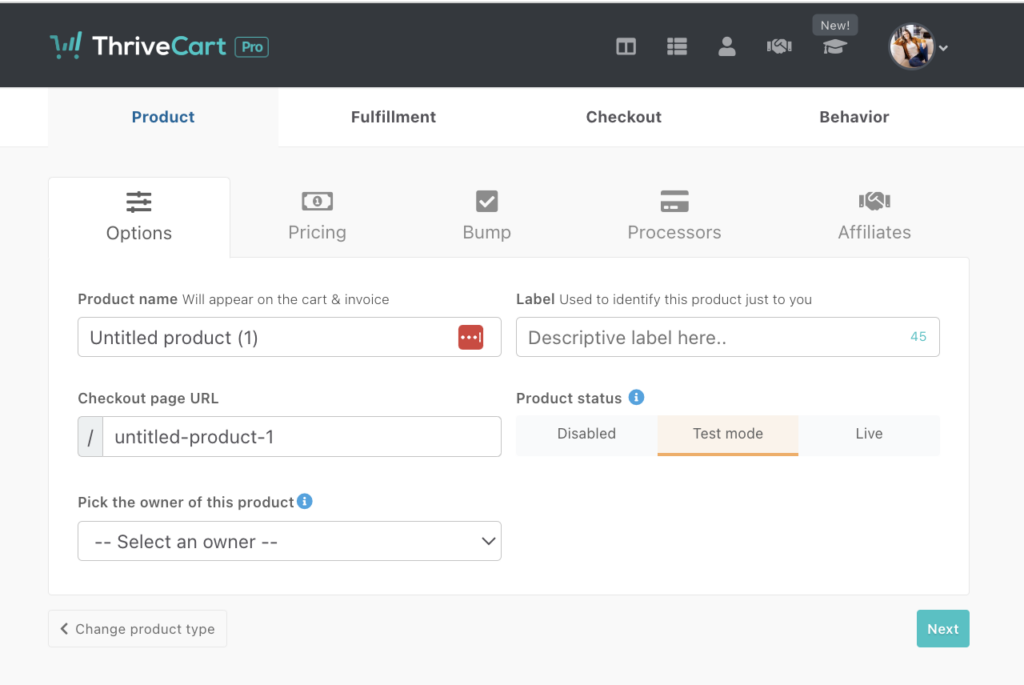
Then you are going to name your product, give it a checkout page url, a label if you’d like to, set the product status and the owner of the product.
Next let’s talk pricing your product.
ThriveCart Pricing Plans
ThriveCart allows you to setup pricing based on a few different variables which really gives you the flexibility you need to make sales.
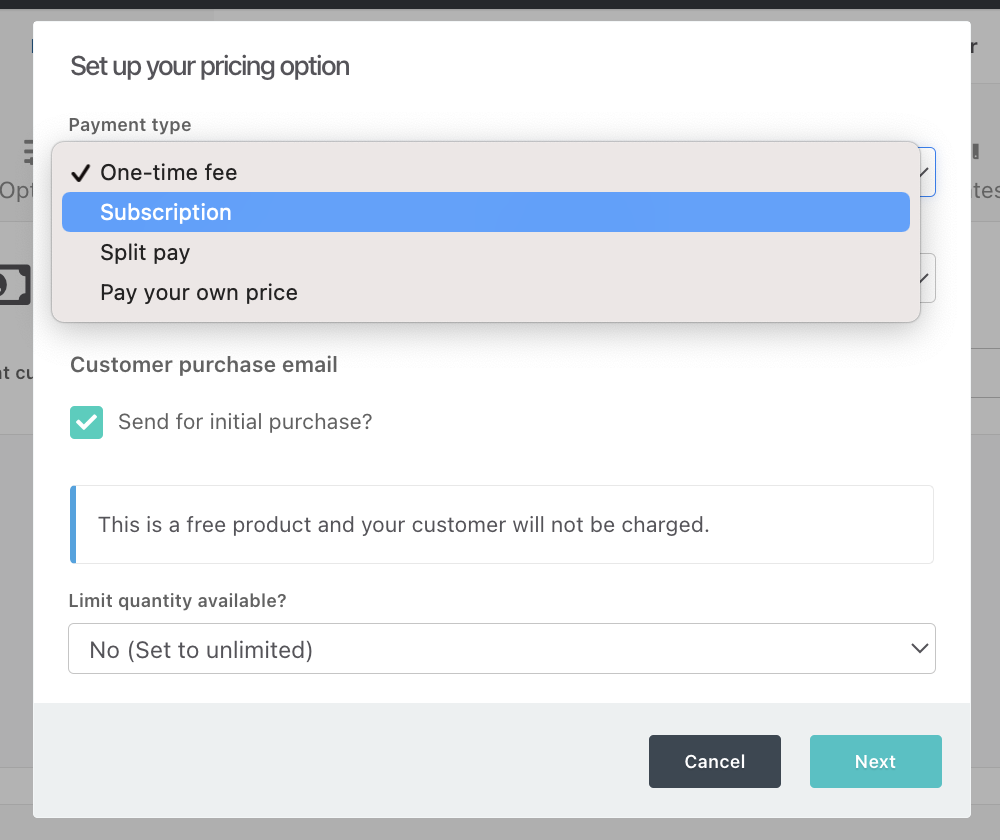
Your four options are:
- One-time
- Split pay
- Subscription
- Pay your own price
- If you’re selling a course or product that is one off you will likely choose one-time fee.
If you’re selling a membership you’ll set it as a subscription unless you just want a payment plan in which case you could customize the subscription timeline.
Split pay does the same thing as above and sets a payment plan for higher priced courses and products.
Pay your own price allows you to set a minimum and the customer can opt to pay more if they choose.
Now that we have pricing down lets move on.
ThriveCart Bump Products
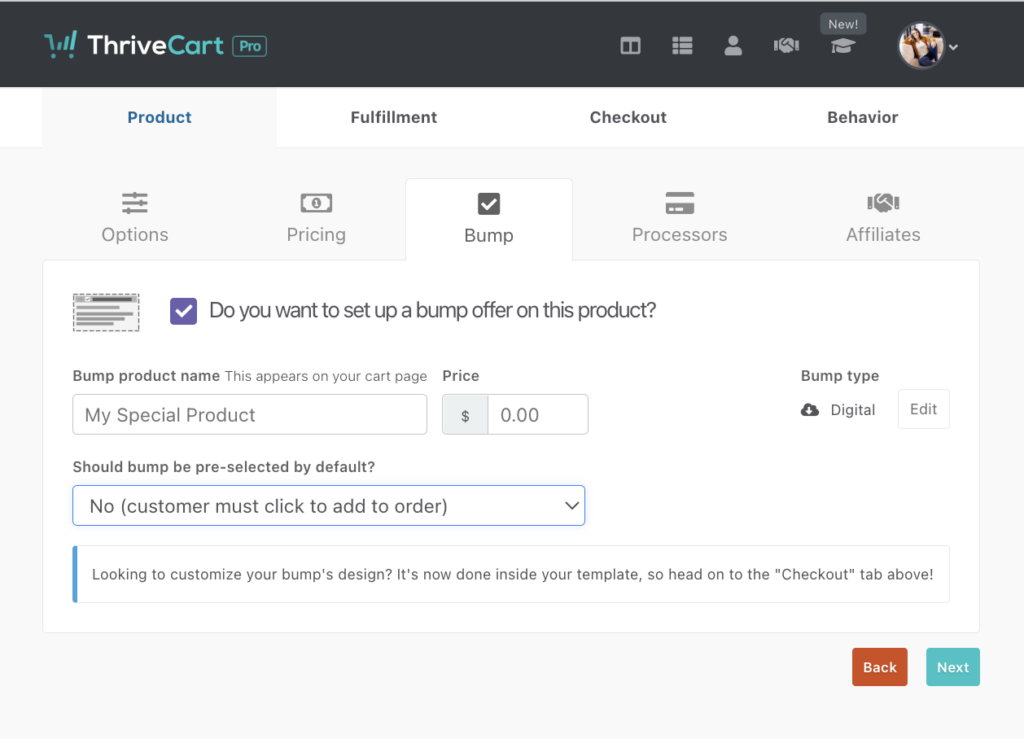
If you have a bump offer you want to use you can choose that on the next tab but you’ll need to setup that bump offer in this screen.
Your product will be uploaded into this screen so you’ll need to create a PDF for the product delivery.
In this instance, I have sold a Google Analytics dashboard and set it up as a PDF with embedded links for accessing and making a copy of the product.
ThriveCart Payment Processors
Choose and connect your payment processors.
ThriveCart Affiliate Setup
On the next screen setup your affiliates if you choose to have them on the product.
ThriveCart Fulfillment
Next, you need to setup your fulfillment options. There are a few to choose from so let’s cover those.
- Display total on invoice
- Send them to a URL
- Add them to membership site
Display Total on Invoice
The first option “display total on invoice” is confusing to me. If you simply want to put the download on the ThriveCart success page I would add a button and hide the “download PDF” button as it will confuse customers. The download PDF button is to download their invoice.
You can drag a button onto the success page and link your PDF to that button if you wish.
Send them to a URL
This is great if you are integrating a third party platform to ThriveCart or you simply want more tracking on your checkout pages.
When my membership was hosted on WordPress I would send people to my membership site login page.
Add them to membership site
If you host a membership on or off of ThriveCart you can opt to add them to your membership site. This will create the transaction and user on your site and allow them to login.
I did this with my MemberPress integration to ThriveCart but you should read up on this on my review post to understand the issues that come with this particular issue.
Right now I have this setting selected on all of my products including my one-off products for sale and the membership.
They then get an email from ThriveCart to log them into their course.
ThriveCart Checkout Settings
Let’s dig into checkout settings and get your cart setup.
Cart Types
There are 4 cart types to choose from.
- Standard
- Sales Cart
- Embeddable
- Popup
I use a standard cart for all of my products but will be migrating some of my products to a sales cart soon. The standard cart offers a sidebar that isn’t optional.
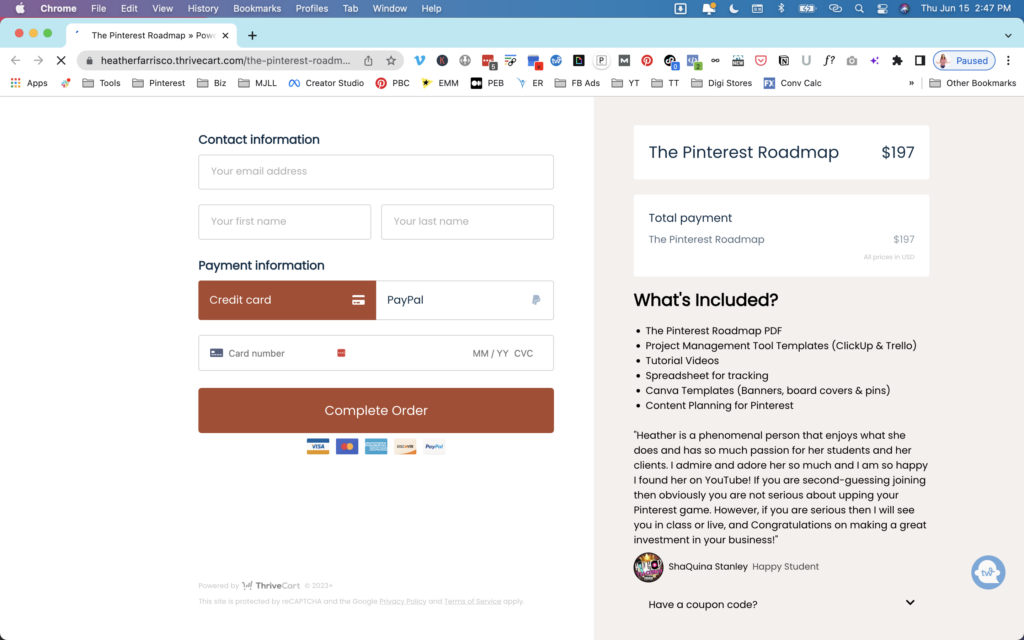
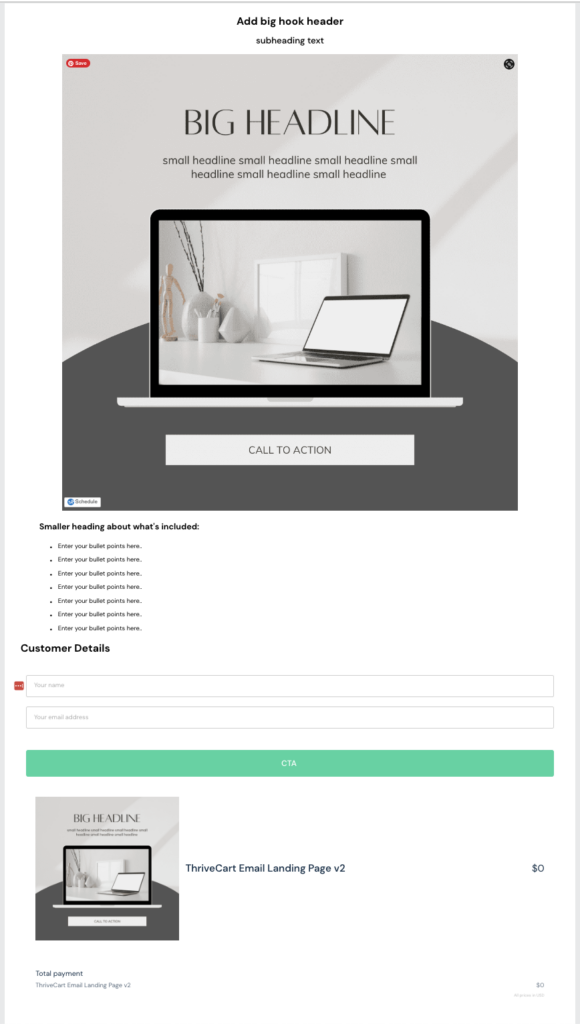
This is a sales cart which is a single cart page with no sidebar.
I think a sales cart would be really good for free offers as well as sales page type carts that you want to host more information outside of just a cart to checkout.
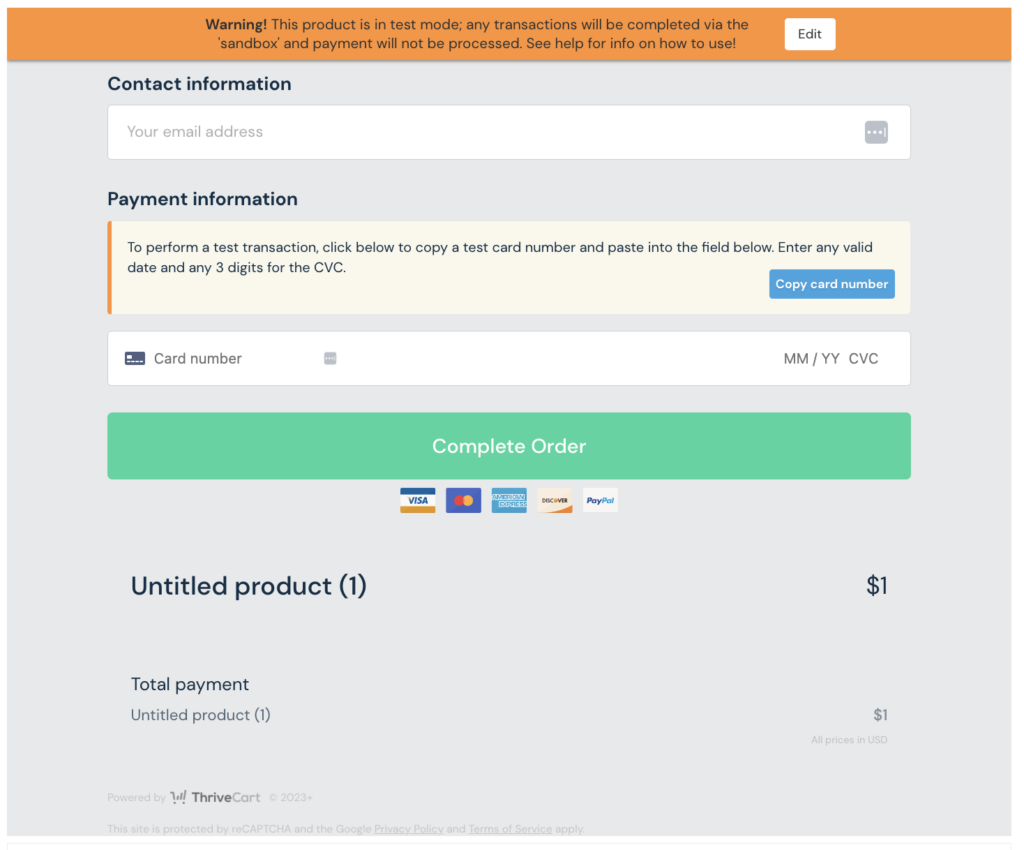
Embeddable carts are meant to be embedded on your own website pages.
Popup carts are embedded as a button to your site or sales pages.
Checkout Final Setup
The final part of the setup process is to setup tracking and behavior for your products. I’m not going to walk you through that in this article because it will be so customized per platform and business.
Connecting Your ThriveCart Product to ThriveCart Learn
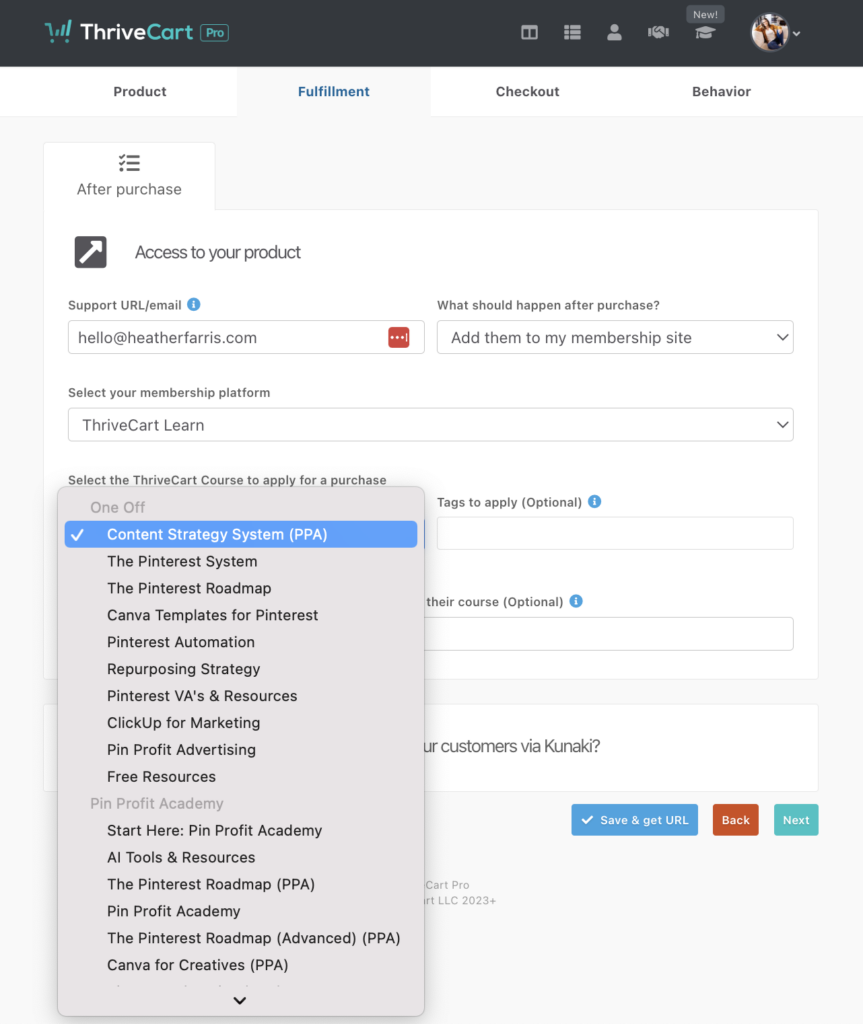
Once you have your product setup and your Learn course setup you’ll need to connect them. This is usually done in the product setup so if you didn’t setup your course first you’ll need to do that then edit the original product.
You’re going to go in and set your fulfillment to “add to my membership site” even if you don’t have a membership but you’re hosting courses on Learn too.
Import Students From Another Platform to ThriveCart Learn
If you invested in Learn+ for an additional $195 lifetime license you can import your customers into your products.
You can do this 1 of 2 ways.
The first is by csv file and the second by importing customers directly to ThriveCart from your email list. I would suggest first setting up tags in your email service provider and applying them to your students. Then import your students via those tags to the appropriate courses.

I have seen a glitch happen where the import via ConvertKit doesn’t import and I have to re-initiate it.
Managing your student access
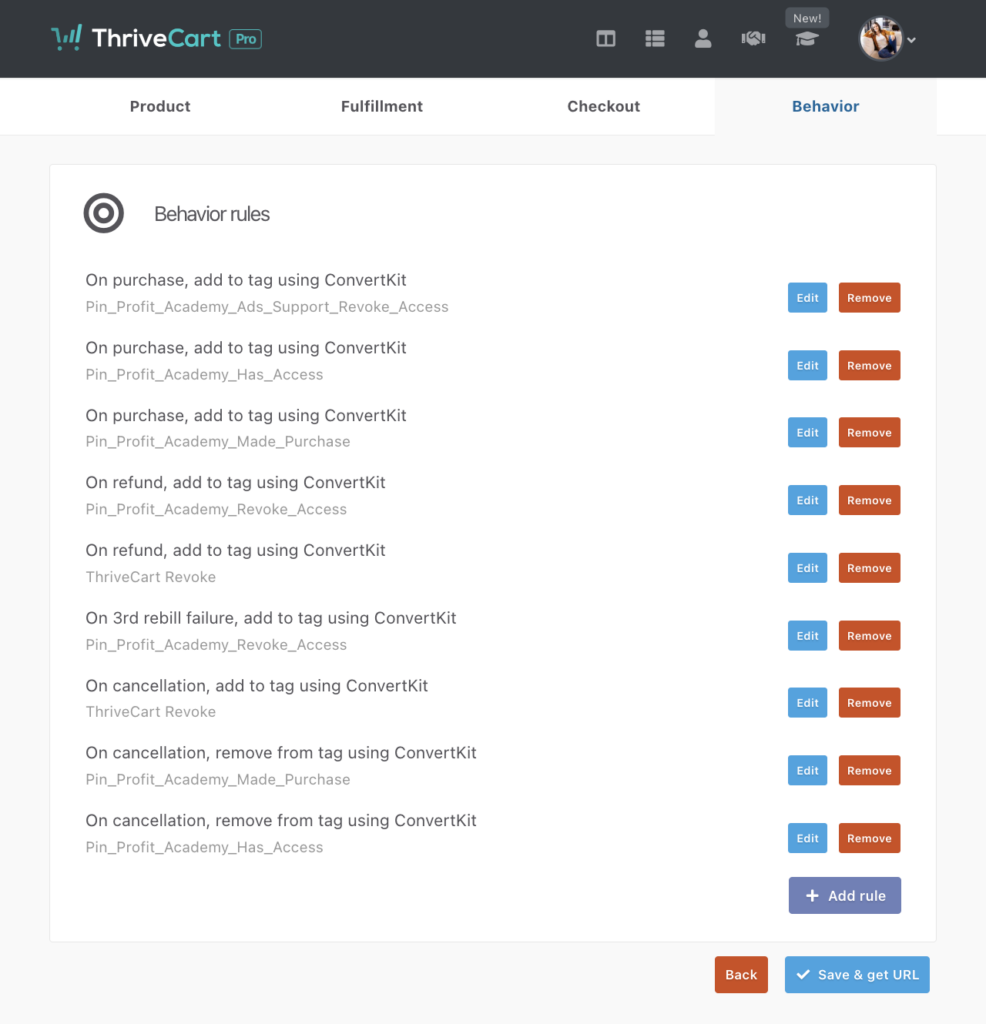
Managing access is a big reason I decided to ultimately move to ThriveCart Learn for my membership. When students would cancel I would have to remove all the transactions from their profiles before they would lose access. I set ThriveCart up to remove the purchase tag and add a revoke tag in ConvertKit then the subscription when cancelled. They then go into a sequence to encourage them to leave feedback and nurture them back to the membership.
To accomplish this you will need to setup at least 2 tags in your email service provider.
You’ll set them both up inside your product settings under behavior.
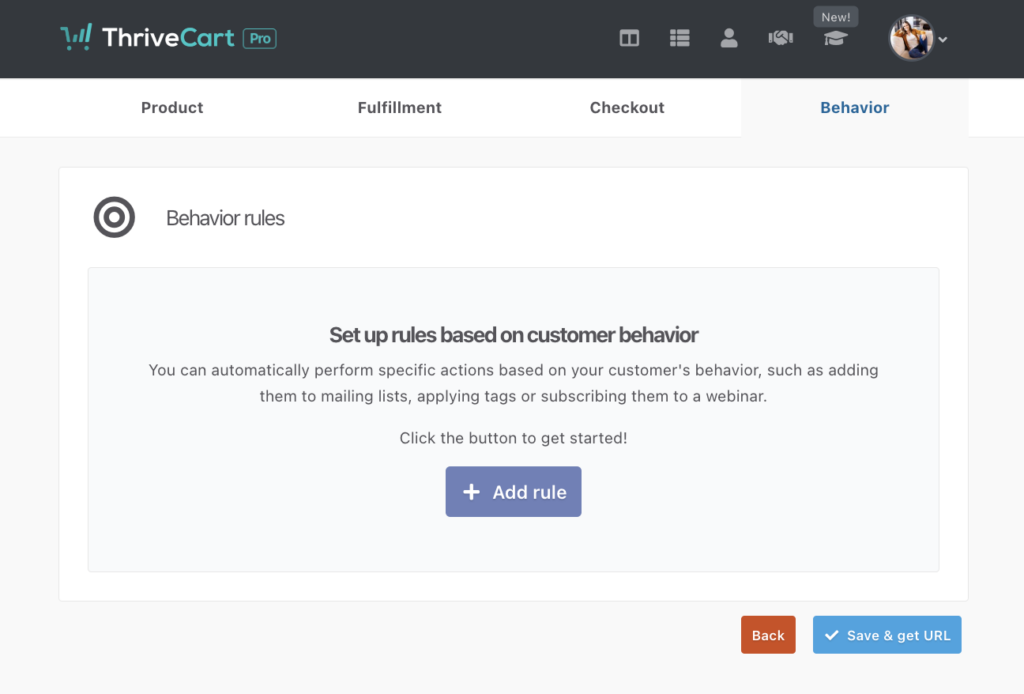
Once you set this up you’ll need to go write sequences to attach when someone cancels and attach that to your tag automations.
Connecting your customer purchases to ConvertKit or another ESP
I have briefly told you about connecting your revoke tags to your ThriveCart products but what about purchase tags?
If you want to use purchase tags you can. If you’re using ThriveCart Learn for your course or product hosting you don’t technically need to add purchase tags.
I prefer to add them to buyers so I can sort in Convertkit by who has purchased products so I can be strategic with emails.
If you choose to do this you’ll need to setup your purchase tags in your email provider first.
Then do the same step as adding a revoke tag and add your purchase tags. You can do this for each product purchased in the funnel too so if you have a bump offer or upsell as well as a downsell you can manage all that with tags.
Depending on who you use for your membership and email service you may need to use tags to initiate access to your materials.
Final ThriveCart Learn Review
Affordability of ThriveCart Learn
ThriveCart Learn comes standard with ThriveCart Standard but the additional Learn+ add-on for $195 makes managing products, bundles, accesses, etc so easy.
For MemberPress I was paying $495 per year for the plugin. Then an additional $200 per year for hosting my website. $9 per year for my domain name and $30 per year for Elementor for my sales page. I also pay $49 per month for a membership that teaches you how to build memberships for my continuing education and growth. Then the one-time fee of $195 for purchasing Learn+.
So overall taking my cost of managing my membership from $1517 to $827 per year is worth it.
Ease of Use
ThriveCart Learn is incredibly easy to use and put together digital products and courses for students to consume. I do wish there were some features that were built in like a universal brand kit.
Ease of Selling
The ease of selling through ThriveCart and connecting them to ThriveCart Learn is so simple. I do wish I could host my membership on my WordPress site because the flexibility of integrations is vast but for the time being ThriveCart Learn is easy enough.
I can have a new course up, the checkout pages created and selling a product in a matter of a few hours given I have prepped the learning materials in advance.
Managing Students
Learn+ is a must for better management of your students. If you are migrating from another platform like I had to Learn+ is going to make managing your students easier.
Even without it your student management is still incredibly easy to navigate. Using my tagging strategy allows me to easily add and remove access to students and keep track of their purchases in ConvertKit.
Integrations
The integrations to ThriveCart are decent. I only need a few to manage everything in my digital product business.
I use Zapier to send an email to students when they cancel to confirm their cancellation & ask for a review.
I also use Zapier to zap those cancellations to Clickup so we can manage their community access.
Other than that I use ConverKit, Stripe and PayPal.
I do wish there was an integration for Vimeo so I didn’t have to go searching for the code to embed. I would also love a Google Drive integration.
Overall I think ThriveCart Learn is a great platform for someone just starting out or more advanced.
As I grow I may invest more into a developer to help me fix my membership and move my members back over but for now ThriveCart Learn+ will have to do.
If you’re interested in signing up for ThriveCart you can start here & grab some of my templates I have put inside my Free Resource Library.
Pin It for Later
Heather Farris went to school for accounting and worked for years in banking and finance. After finding all of that entirely too boring she started her first blog in her basement in August of 2016. She has started 3 blogs in the marketing, motherhood and travel niches and used Pinterest to grow them all. She quickly became the go-to Pinterest strategist in her peer circles and has been implementing strategies, driving traffic and sales through organic and paid tactics for her clients. On this blog and her YouTube channel, as a renowned Pinterest marketing expert, she educates the public about clear and transparent marketing strategies to help them to grow on Pinterest and in other places online as a renowned Pinterest marketing expert.



Hey Heather,
Thank you for this comprehensive review of ThriveCart. I am going to bring my memberships over to it because of constant issues that I’m having. Your review was just what I needed right now.
Cheers
Lloyd