Heather is a seasoned
Pinterest marketing expert & educator using the platform since you could reach the bottom of the feed - 2010.
About Heather Farris >
How to Create Video Pins for Pinterest & 6 Benefits of Using Video
May 11, 2022
Did you know that creating video pins for Pinterest is a great way to stop the scroll and drive overall engagement on your Pinterest profile?
If someone was to engage with your video pin while browsing Pinterest, these pins could get your content into the feeds of those pinners in the form of static pins, catalogs, and idea pins.
Now there’s a little bit of a caveat here that no one is telling you about on Pinterest marketing channels on YouTube. Many people creating Pinterest marketing content teach you different ways to go “viral” using idea pins, but that’s not quite the case. They leave out the fact that it is hard to figure out how to leave the platform on the video pins in their current format.
The Truth About Using Video Pins for Pinterest
When pinners interact with video pins on Pinterest, they should know how to leave the platform from those videos, just like any other pin. You can put the URLs on video pins, but then viewers have to click the three little dots on the bottom right-hand corner of the pin, open up another menu, and click the ‘Visit link’ menu option.
If the pinner hasn’t interacted with a lot of video content or knows it doesn’t work as a standard pin, they may scroll on after watching your video. That’s ok. Even if they interact with your video, the algorithm is still going to feed them additional content to their feeds.
This is one caveat that you should know though. Many Pinterest marketing creators on this platform are not giving you the full truth. My whole mission for my YouTube channel and blog is to be completely honest and transparent with you. So, if you are going to be using video pins, you must think about them slightly differently.
RELATED: How to Create Video Pins on Pinterest Effortlessly
Introducing Creatopy for Making Video Pins
In this blog post, I will teach you how to use Creatopy. I recently started using this video creation and editing tool in my Pinterest ad strategies. My Pinterest ads manager and I needed a better way than Canva to create videos for our client’s ads. We needed to add captions to them and found Canva to be a bit clunky. We found Creatopy through one of our clients, and we have really enjoyed this tool.
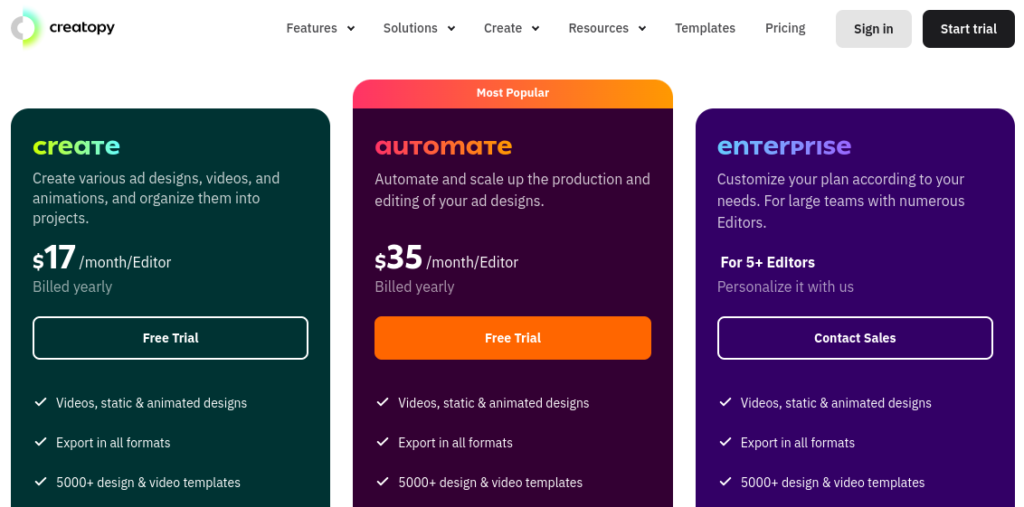
It is pretty affordable if you pay yearly. You get it at $17 a month if you pay for the annual plan. If you pay monthly for their first tier, you get it at $32 to $37 per month. Click here to learn more from Creatopy. They give you a seven-day free trial which I utilized.
Let’s jump right on to the tutorial.
How to use Creatopy to create video pins for pinterest?
When you get started and get into Creatopy, you will see the dashboard. You won’t see recent designs because that can only be seen when you start creating your own design content here.
It will look a lot like Canva here, where you can see all the different types of image sets that you can create. The great part of this platform is that it is not just great for creating videos, you can also create images here.
When you start scrolling down, you can see the other template styles that you can also create from Creatopy. I am not a huge fan of their templates. I think they are kind of clunky, very corporate-like. They are not very creative, in my opinion. But that’s not what this post is about. This post is about creating video pins.
I created a new profile on Creatopy, so you don’t see all of our client video pins. With this brand new Creatopy account, we will create a video pin together.
RELATED: 10 Canva Hacks to Save You Time When Making Pinterest Pins
Gather your assets
The first thing you are going to do is gather all of your assets, like videos or logos you want to upload to your desktop. So when you create your first design, you can go ahead and upload those to your Creatopy account.
Find your template
I want you to find your template for sizing. Most video pins are 1080 X 1920 pixels. In this case, there are all kinds of different examples here that you can start with for templates. In the video tutorial I show you a template style, and you can start from blank as well.
This is what your whole design is going to look like. You can get rid of the sidebar by striking it down. Name your video at the top bar. Then you can share it with people by clicking the button at the top right corner.
If you want to share with another team member, you can do it with the share bar. However, when you go to download this, you can also have it emailed to you. You can download it as a PNG and select “email me the link when it is ready.” I prefer that because when you are all done, you are not waiting for the video to render from Creatopy.
In the left bar, under ‘My uploads,’ you would upload any videos you want to utilize to create the video pins.
In my case, I film a lot of face to camera videos for Instagram reels, TikToks, etc. So I could upload any of those here. Then you can add them to the slide. In this case, this is just a stock video and a template.
If we want to go back and create something from scratch, we will click Create > Video Story > Blank Design.
They have stock videos that you can use under Elements. If you’re on a paid plan, which you have to be on to use this tool, you have access to their stock videos. If you have a particular industry that you’re playing within and don’t create your own video, you can definitely utilize the stock videos.
RELATED: 7 Ways to Generate Content Ideas Even When You’re Not Feeling Creative
Creating your video
In the video tutorial you’ll see me mock up a video for myself and create a video pin just from a stock video so I can show you how to utilize this tool. Now your video is obviously going to be your red layer. However long the video is over here, is how long it’s going to be on your timeline here. If you want to make this video longer, all you have to do is simply drag your red layer and make it longer.
If we wanted to make the video 14 seconds, you could type in how many seconds you want in that box on the right, which will make it super easy.
You can also add transitions. If you have more than one video that you’re making into a longer video, then you would go ahead and add a second slide and then pull that video in.
We’re going to add a second slide with another stock video. We’re just going to pretend this is all me. Our second slide is 6 seconds. If we want to make it match the last one to be 12 seconds, we will do that. Then in our layers, you can click Play. Now the two videos are next to each other in this one layer.
RELATED: Creating Idea Pins With Video Even If You’re Not A Video Creator
Add elements
After this, we can begin adding some elements like our logo. I uploaded a transparent logo to show you how to do this. It would be in your all uploads file. I can position the logo, and it will be on this video the entire time.
I can make this video layer shorter and make it six seconds. Then we can duplicate that layer and, in the next six seconds, move the logo to the right corner. When we play this video, the logo will switch seamlessly from the left corner to the right.
I also want to point out that if you click on the corners of any of the layers that you put on to this document, it will also give you some built-in animations that you can do. So you can say I want the first one to fade in, and I want the other one with a fade, they’ll both fade. You will see the fade when you click play.
Add text overlay
If we wanted to add some text to this and have it show the entire time, we are going to go ahead and click ‘Add heading.’ Then we can begin adding our text.
If you want to add a background behind that text, you should go back to Elements and go to Shapes and then choose whatever shape you want.
Choose a rectangle and shrink it down to fit behind the text. Then choose layers. Make sure it is in front of the video but behind the text. You can also change the color of the background and the text. This text will show on the video the entire time.
If we don’t want to see the text the entire time and want more text to show up throughout, you need to add more layers and more text.
Pay attention to the names of the layers over on the left. We have Shape 1. If I were to make that disappear, you could see which one it is. We would want to make sure that we lock the videos that can’t change.
If you need to edit that shape, we would need to shrink this down. If we wanted to shrink down shape 1 to six seconds, and then we want shape 2 to go forward to six seconds, you just drag and drop on the timeline. It’s incredibly easy to make this work, and then you can lock any of those once you’re done.
You would need to do the same thing on heading 1 and heading 2. You would want it to match whatever your shape is behind it. If you have a background behind it, we would come in here and shrink it down to match.
You can drag and drop these things on the timeline. So if you have shape 1, heading 1, you want to make sure that the layer that needs to stay constant is below it. In this case, we have the shape below the heading, and up here, the shape is before the heading as well. So that is how you drag and drop in. It’s a drag-and-drop editor, very easy.
There is an animator on the right if you want to do any other fancy animations. I’m not going to spend time doing that in this blog post.
Add buttons
There are buttons here, so if you want to add some buttons to your video, you could do that. Since this is an e-commerce video that we want people to click through on, you can add a button that says Shop Now.
If you want to change the color gradient of the button, you could definitely come in and change it. Change your gradient by clicking the diamond, and then you will have your second gradient color to the right. I would take two similar colors in my color palette and make that gradient up.
In this case, the Shop now button would be constant the entire time. Maybe you only want it to show up in the last few seconds.
RELATED: The Ultimate Pinterest Traffic Strategy for Bloggers & E-Commerce Shops
Value pack the first 6 seconds
As a reminder of what I said earlier in the video, you want your first six seconds to be the most jam-packed, the most value packed with your calls to action. So, in this case, we definitely have our Shop now button in the first six seconds.
Once you are happy with your overall design, you would simply play it full all the way through.
Add audio tracks
You could also add music here. I don’t generally add a ton of music. Go to elements and audio tracks and add the audio tracks of your choice.
Download your video
Once you are happy with everything at that point, you will go ahead and download your video as an MP4 file. Click Download, and a ‘Download in progress’ box will pop up.
Within a few seconds, you’ll get prompted to have it emailed to you, I always say “yes”. It then goes straight to my inbox when I am finished.
Benefits of using video pins on Pinterest
If people can’t find an easy way to leave the platform, and they actually have to go through a couple of extra clicks, then why use them at all? Here are some of the benefits of using video pins on Pinterest.
#1 – They stop the scroll
They help to drive engagement on the platform and stop the scroll. If we can have people stop scrolling and engage with your video, then the algorithm is going to continue to serve them more of your content in their home feeds, related feeds, and search bar.
RELATED: How to Get More Followers on Pinterest
#2 – Give additional context
Video pins actually help to give additional context as to what you are promoting in the video versus static pins. You don’t have very much real estate to capture the attention with the static pin. Your text overlay has to be really good. Your imagery has to be really good. So a video can actually be longer and give additional context to what you’re trying to get people to do.
#3 – Help build a trust factor with the audience
The video is obviously very visual. It can help you to build your trust factor with your audience on Pinterest a lot faster than if you were just using static pins. So that is definitely a huge benefit.
#4 – Increase overall sales
If you’re utilizing video pins in your Pinterest ads, you may notice an increase in overall sales. Videos definitely perform better in advertisements for our agency. We use a lot of videos for our clients. We will actually repurpose a lot of TikTok videos or Instagram reels for our clients because they’re already creating product-centric videos that talk about the benefits and transformations.
So they’re creating videos on other platforms, removing those logos and watermarks quickly, and then utilizing those videos in our ads. Videos are a great way to stop the scroll and capture more attention in your advertising.
RELATED: How to Start Using Pinterest to Drive Sales
#5 – It’s a one-tap click
A bonus of using videos in your ads is that there isn’t an extra step between finding the video and getting to your site. It’s a one-tap click. They click it, and go straight to your landing page. With advertising, there isn’t this extra layer of trying to figure out how to get off the platform. So definitely a bonus there.
#6 – Build long-term engagement
Now I want you to remember that not everyone who is interacting or engaging with your video on Pinterest may be interested in even leaving the site. They may not even know how to utilize videos in a slightly different way with a slightly different mindset. We use videos in our Pinterest Agency for organic clients to increase engagement with the algorithm to continue showing our static Pins or catalog pins to those pinners.
We’re using video as a top-of-funnel engagement driver, much like we use idea pins with the notion that they’re not really a traffic driver. So you may decide to utilize that same strategy knowing that people may not click on your video and leave the site organically, and you may want to use them as an engagement builder.
Overall, it builds that engagement gets that interest in your videos, and Pinterest will begin to show that person more of your content in their feeds.
Canva vs Creatopy
Now, you can use tools like Canva to create your videos, but we’ve found Creatopy is more seamless and user-friendly. It is a lot less clunky, and the transitions are smoother. When it comes to creating our videos, it just works better overall.
If you’re just creating an animated pin or a GIF-type pin, then Canva is definitely a great solution for doing that. But if you’re making more long-form video pins, I would suggest front-loading the most essential things on that video in the first six seconds because the average watch time for Pinterest videos is about 6 seconds. Creatopy is a video editor that you will want to use to create video pins that are more long-form.
The video example that I showed earlier has a 10-second watch time because I’m going through slides. I did create that one in Canva. I slammed a bunch of different images together and made it a video. So there are different ways to go about this.
RELATED: Why You Need a Content Strategy Before You Ever Begin Marketing
Frequently Asked Questions
Can you make video pins on Pinterest?
Yes, you can make video pins on Pinterest. Just open your app on your phone and click create a pin and film right from your phone if you wish. You can also upload video you created from other platforms or directly from your computer, phone, tablet, etc.
Use tools like Creatopy, Canva, Vimeo, Adobe, PicMonkey among others. Usually any tool you can edit video can be substituted for creating video pins. Read this post for more info on simple ways to make video pins.
How long can video pins be on Pinterest?
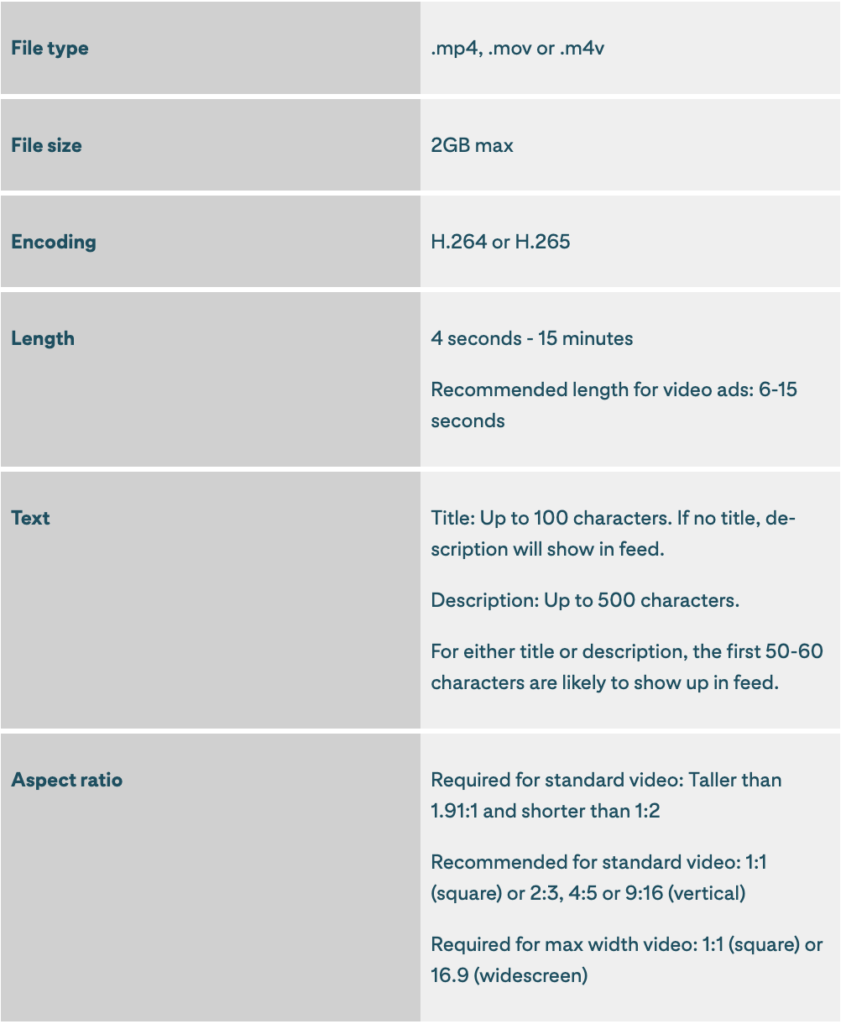
Video pins on average are watched for about 6 seconds in my experience. Unless it’s a video showing a full tutorial most people aren’t watching longer videos on this platform. Here’s the details on how long the video pins can be as well as file types, aspect ratio, etc.
Final thoughts on video pins for Pinterest
If you’re here and you’re interested in learning more about Pinterest marketing strategy, be sure to head right on over to our Pinterest Marketing playlist. This will help you to learn more about Pinterest marketing and how to get more people from Pinterest to your site to get more traffic, sales, and brand awareness.
That’s it for this week. We’ll see you next time.
Pin It For Later
Heather Farris went to school for accounting and worked for years in banking and finance. After finding all of that entirely too boring she started her first blog in her basement in August of 2016. She has started 3 blogs in the marketing, motherhood and travel niches and used Pinterest to grow them all. She quickly became the go-to Pinterest strategist in her peer circles and has been implementing strategies, driving traffic and sales through organic and paid tactics for her clients. On this blog and her YouTube channel, as a renowned Pinterest marketing expert, she educates the public about clear and transparent marketing strategies to help them to grow on Pinterest and in other places online as a renowned Pinterest marketing expert.
