


How to Create a Blogging Workflow Using Clickup
Have you taken the time to create a blogging workflow for your business? Maybe you don’t have a blog but you have a YouTube channel or podcast with long-form content. I use ClickUp for my blogging workflow and it’s been such a lifesaver & time saver. Every piece of what I do for my blog and my YouTube channel, takes place in ClickUp before it’s ever implemented online.
So if you are looking for a way to dump ideas, piece your content together, and keep track of every piece of the puzzle, hang on to your hats because I have a good one for you.
How to Create a Blogging Workflow Using ClickUp
Creating a workflow or a process, as some call it, is the easiest way to make sure you have everything done when creating content. Make sure you’re checking all the boxes, you know?
Creating a blog post is a lot more work than most people realize, not to mention a YouTube video. Between brainstorming, researching, outlining, creating, and ultimately marketing that piece of content, there is so much to do.
So in this post today I’m going to cover the areas of the workflow you will need to create, then I’ll break them down a bit further.
What You Need in Your Workflow:
- ClickUp
- a Channel in ClickUp for your blog/video content
- a List for all of your content tasks
- Checklists for each task as needed
- Automation to move processes along
That is the rough outline of what you will need inside of ClickUp. I’m sure you can duplicate this to another project management tool and customize it how you like. Before we dive into the whole process, I want to go ahead and break down what each piece means.
RELATED: A Super Simple Pinterest Strategy for Bloggers
What is a ClickUp Workspace?
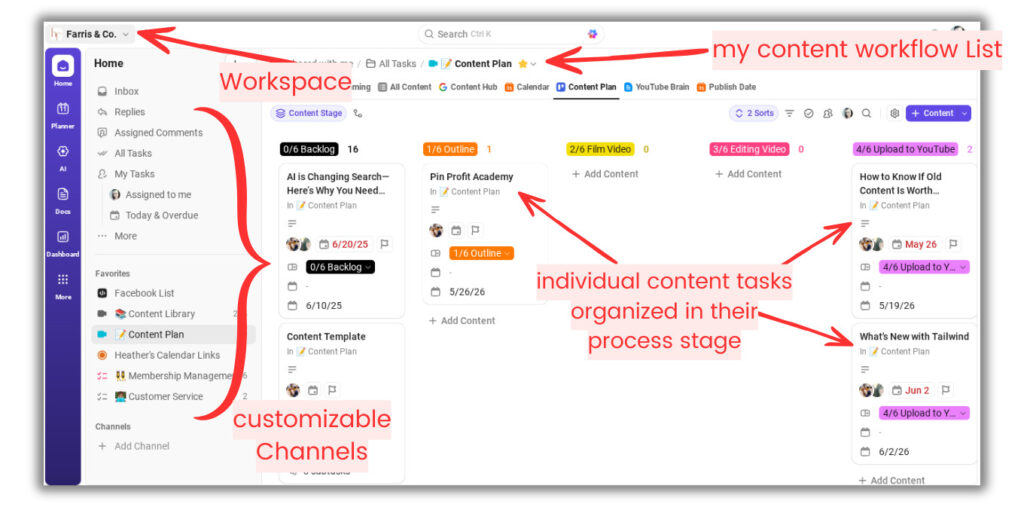
A ClickUp workspace is an entire area for everything you have in ClickUp. My workspace is both my marketing space and my client space. This could be for your entire brand or small business, or separate ones for different clients or businesses that you run.
What is a ClickUp Channel?
A ClickUp Channel is an individual area where you can organize within the entire workspace, they have all kinds of different names that you can organize how you wish. I have two primary areas in my ClickUp for both Marketing, then for Clients. You could have different channels for different brands you create content for, or projects you want to separate.
In my marketing space I house everything for my marketing and business that isn’t client related. So my blog and YouTube channel, pitching podcasts, funnels, Academy members, customer service, etc.
What is a List in ClickUp?
A List in ClickUp holds all the tasks within a Channel or grouped area. You can organize them in boards (similar to Trello), or just line items like in a spreadsheet. Each List can be customized in many different configurations, based on how you want to view them or organize them.
What are Tasks in ClickUp?
Tasks are a single item you want to track within a List. I use a single task for every piece of content in my blog posts list. Within tasks, you can set up process stages to see where things are in your system, add a myriad of details in each task too. Again, all as customizable as you can imagine. There are even subtasks you can build a level deeper with all the same functionality within a task.
What are Checklists in ClickUp?
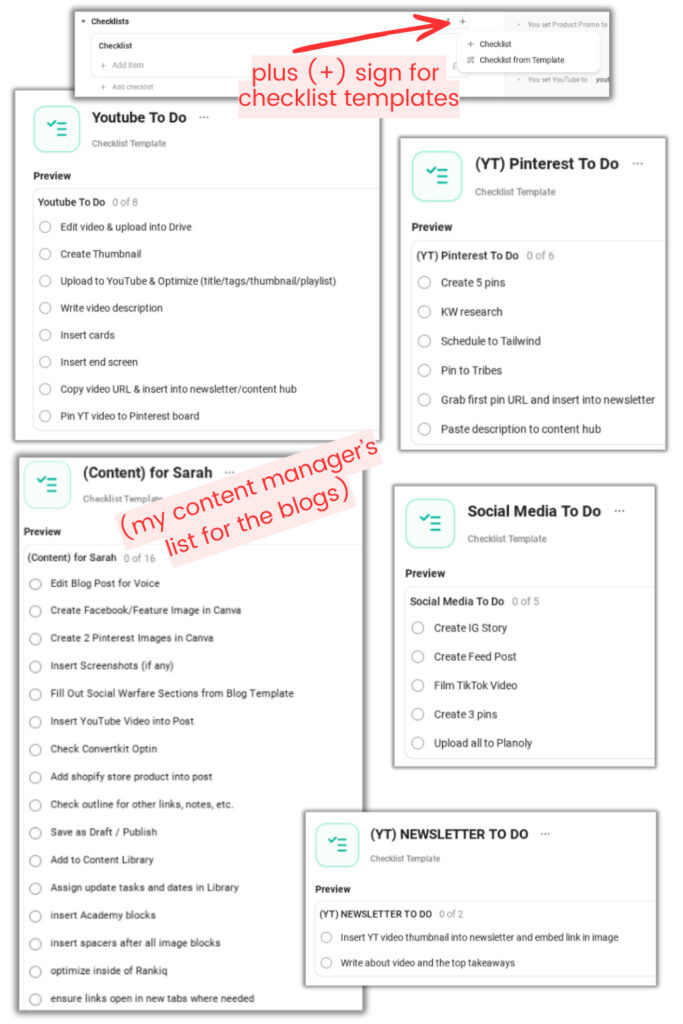
You can add checklists to tasks so that you know what to do or review for each content task as it exists within your system. For example, my blog manager has a specific optimization checklist that she goes through before she publishes every single blog. She adds it to the tasks and I’ll show you how to create those below.
RELATED: How to Optimize Your Blog Content for Pinterest Users
What are ClickUp Automations?
Inside of anything you create in ClickUp, you can create little functions that happen automatically. Like mini zaps (like Zapier) or recipes that get triggered and completely to assist your process working a lot faster and smoother. You can have an automation add or subtract details from a task, tag certain users for reminders, add deadlines, insert tiny templates or checklists, etc.
It’s really whatever you want to play with and design. There is so much more to automations and how they work, that I’m going to share ClickUp’s help page that you can explore here.

Putting This Blogging Workflow Together
Because there are many different ways you can do this, I’m just going to show you how I’ve built mine and walk you through each of these things. My overall content creation process goes from Idea > YouTube Video > Blog Post > Pinterest > Social Media > Newsletter > Library.
For every content idea, I have one single task in my ClickUp list. This task moves around and gets added to and worked on by multiple people. And for every process step, I have subtasks. Within those subtasks, there are checklists and fields to complete. You’ll see below.
RELATED: Steal the Full Marketing Process of My Pinterest Agency
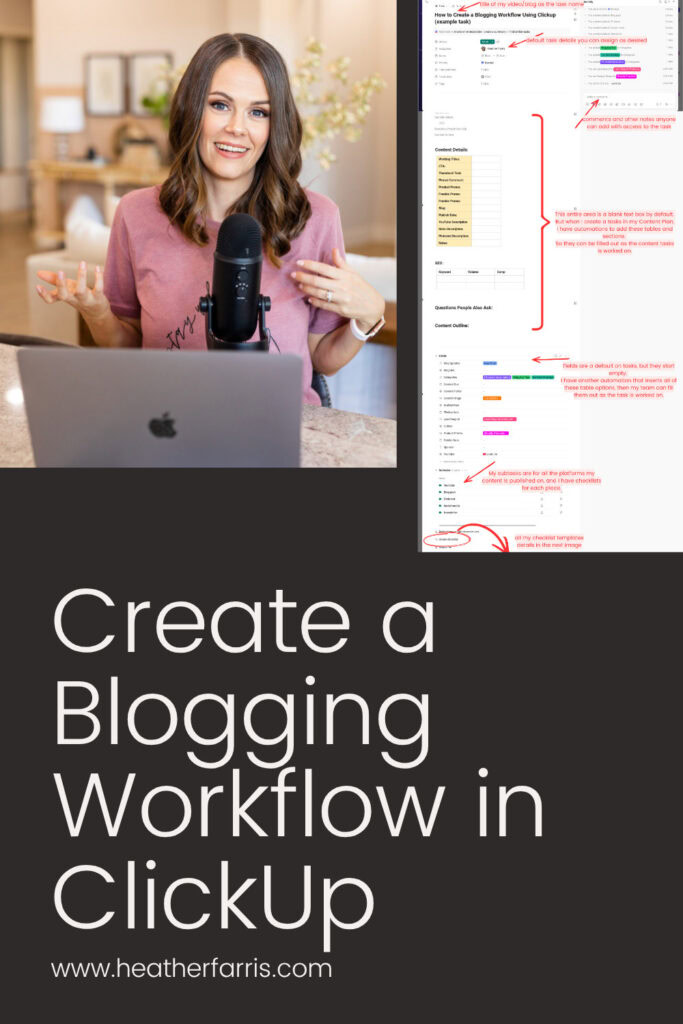
My Templated and Automated ClickUp Content Task
I’ve taken a giant screenshot below so you can look, because it will make more sense. I have setup automations and templates so that most of the information fields you’ll see are auto-populated as soon as I open a task. If you’re starting with empty tasks, you can click the lightening bolt icon in the upper right of tasks windows to create the automation you want. Same with checklists, you can create it once, then click on the three dots in the upper right to save it as a template.
You don’t want to have to manually add everything every single time, then there’s no benefit to using a project management system at all. So decide how you’d like yours, take inspiration from mine, and let it work FOR you as you create.
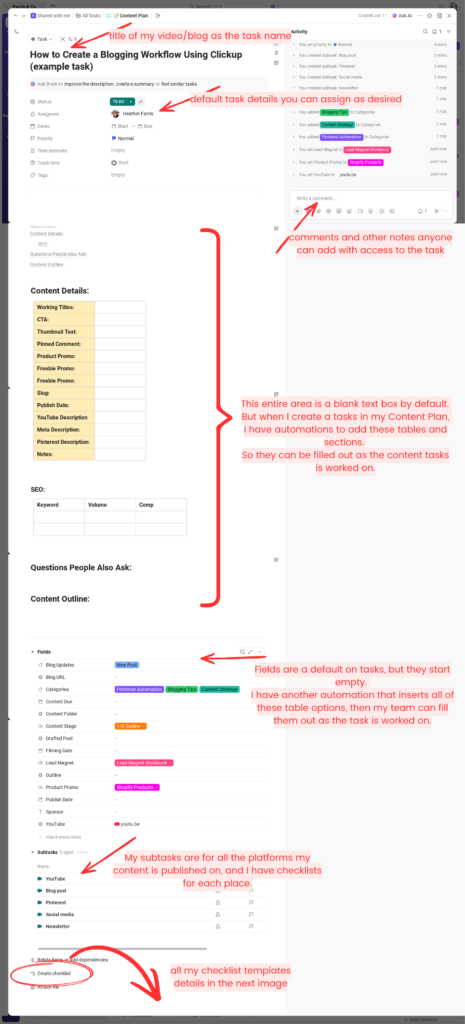
Essentially, if you were to type out your entire process, and giant how-to document of what you do from content idea, to full completion with it…. have it listed or outlined in your tasks in your ClickUp blogging workflow. So it’s automatically built out for you and you can’t forget a thing. My whole team still uses these checklists and details built into every task after years of still doing the same process.
RELATED: ClickUp for Agencies: How We Use ClickUp to Run a Pinterest Agency
Final Thoughts on Creating a Blogging Workflow in ClickUp
I hope this tutorial and all my examples makes it easier for you to see all the basic pieces of creating a blogging workflow. Hopefully it simplifies it for you! I know for the longest time I took way too much time to research, write and publish content because I tried to do everything at once.
This workflow allows us to batch everything. So all my research, outlines, images, and content is all batched throughout the process. And I don’t forget a step, or get lost in what’s been done for which piece of content, etc. My team knows exactly where things are and what’s complete too.
If you’d like this exact content workflow in ClickUp, you can grab the ready-to-go system in my Content Management templates in my Shopify store. They also come with training videos on exactly how to use them in further detail. Check those out and get a big jump start on your blogging workflow.
ClickUp Content Management Templates
These templates are designed to help you brainstorm, produce, and maintain your content systems in a streamlined way that keeps you out of the weeds and producing high quality content.
Pin it for Later
Heather Farris went to school for accounting and worked for years in banking and finance. After finding all of that entirely too boring she started her first blog in her basement in August of 2016. She has started 3 blogs in the marketing, motherhood and travel niches and used Pinterest to grow them all. She quickly became the go-to Pinterest strategist in her peer circles and has been implementing strategies, driving traffic and sales through organic and paid tactics for her clients. On this blog and her YouTube channel, as a renowned Pinterest marketing expert, she educates the public about clear and transparent marketing strategies to help them to grow on Pinterest and in other places online. She created Pin Profit Academy and helps small business owners just like you to master their Pinterest marketing strategy. Heather is now a Pinterest Educator, one of the very few sponsored by Pinterest.


Hello Heather!
Thanks for massive contribution for content management in Clickup!
I have a question:
Is there an option to use Clickup effectively not just for managing content creation but also creating it? Let’s say social posts or articles? I know there is doc view, but usually you need to nest pages inside doc or create a lot of docs which make everything cluttered in List view or Doc view. But maybe there is a way..
I personally create new google docs in the task view. I connected my google account to clickup and this quickly creates google docs in that task. I personally do not love the current doc view or messy hub of docs. It’s overwhelming to me. I do however outline all of my youtube videos & blog posts as well as write all my social content right inside the clickup descriptions in tasks.
Wow, Heather, thank you for such a detailed and helpful post! I just joined clickup and I can SEE that it’s going to be great but had no idea where to start, have about fifty ‘space’s by accident, am off to go tidy up and automate right now!
Thank you so much!
This is a great post – I’m just figuring ClickUp out and understanding that you use Google Docs so that your clients can edit and approve the files is really handy.
Appreciate your help.
I do use google drive embeds & really enjoy that feature!
Hmm it seems like your website ate my first comment (it was extremely long) so I
guess I’ll just sum it up what I wrote and say, I’m thoroughly enjoying your blog.
I as well am an aspiring blog blogger but I’m still new to everything.
Do you have any tips for newbie blog writers? I’d genuinely appreciate it.
Asking questions are truly good thing if you are not understanding anything totally, but this
article provides pleasant understanding even.
You’ve made some good points there. I looked on the web to learn more about the
issue and found most people will go along with your views on this site.
Amazing website
Very nice website i like this article good job admin