Heather is a seasoned
Pinterest marketing expert & educator using the platform since you could reach the bottom of the feed - 2010.
About Heather Farris >
ClickUp for Pinterest Managers: Snag Our Pinterest Client Management System
September 20, 2022
Are you a Pinterest Manager or a social media manager looking for a Pinterest client management system to manage your clients using ClickUp? Well, I have the workflow for you.
It is much more simplified; it’s all in one place and is a better way to know what’s going on with all of your clients at one time, through the entire process of your business.
So, let’s dive right into ClickUp for Pinterest Managers. I’m calling this ClickUp for Pinterest managers because I am a Pinterest manager; I only do Pinterest.
However, you can adapt the same ClickUp workflow for Instagram, TikTok, Facebook, or other social media platforms you manage. If you do e-mail marketing or any digital marketing in general, you could adapt this to fit your needs.
Pinterest Client Management System in ClickUp
I’m Heather Farris. I run a Pinterest marketing agency and have been doing this for a long time. Over the years, I have refined my process.
I published a video about this before, which was quite a hit on my channel. Now I want to update that workflow to help you out more – to get you out of the weeds and to know exactly where your clients are through the process.
I use my workflow, this exact template, with a team. But in the tutorial, I explain how you can use it with or without a team. You don’t necessarily have to have contractors on your team or be an agency to utilize this ClickUp list. Whether you’re solo or have someone helping out, this is for you.
I’m excited to show you this template, so let’s dive into the ClickUp for Pinterest managers workflow.
RELATED: Using ClickUp for Client Management
ClickUp for Pinterest Managers
This workflow as a Pinterest client management system is different. I have set this one up so that every client is in the same workflow. It can get a bit messy if all of your tasks are showing.
So if you have a lot of clients, don’t be afraid to use filters. Filter them by:
- the due date
- assignee
- what you’re working on
- what someone else is working on
That way, you can clean up this view because it gets messy and hectic when looking at everything on the list.
RELATED: Steal the Full Marketing Process of my Pinterest Agency
Have editable statuses in your Pinterest client management system
To dive into this list, we’re going to start with the statuses at the top. I’ve set this up to have seven active statuses, two done statuses, and one complete. The active statuses may vary depending on whether or not you’re working with a team.
If you are working with a team, let’s say a graphic designer, then you may need to keep the image piece or the image statuses. If you’re not working with a graphic designer, you may want to get rid of those. Depending on how you want to work the ‘To do’ and ‘Pin plan in progress’ pieces, you may want to eliminate one of those.

So these are my current active statuses, and all of the clients are dumped into this one list. I like to look at it in a Board View myself; however, you can also look at it in a List View, and there are a couple of little goodies over here that I want to show you before we dive in.
My team includes two organic Pinterest managers and a graphic designer. I like to know at a glance which Pinterest assistant is assigned to which client and then if that client has a graphic designer attached to their file or not. This system categorizes them in my mind, and it is not for productivity or anything else.
Let us look at this and go through each status.
RELATED: How to Create a Client Onboarding Process Using ClickUp, Honeybook, and Zapier
To do
Every month there will be a main task on the To Do list, and that main task will have a recurring due date on it for the next time I need to create a pin plan for the client. Right now, I have them set up for September 18 for this example.
On the 18th of each month, this task will be broken out, and it will get marked as Done when it is done; it will come back into this list for the next month. The only tasks that live in the ‘To do’ are the tasks that will be coming up for the next month.
Pin plan in progress
Once I start creating the pin plan for the client, everything else gets moved to the Pin plan in progress. It sits there while I work on a client’s pin plan.
Pin plan ready
I have two assistants and a graphic designer. So they come into this picture when the pin plan is ready. I assign which assistant takes the client’s pin plan and they are notified to start working on it. The due dates adjust and change as well.
Images in progress
The graphic designer or the Pinterest assistant who makes the images will then pick up that task and move it to Images in Progress. The task is here while they create the client’s Pinterest images. This is so I know they’re working on the plan I created.
Images for approval
Once the images are ready for approval, my team moves the tasks into Images for Approval, and I get automatically added to check them through an automation. Let me show you automation now.
RELATED: 7 Pinterest Client Management Tools I Use Everyday
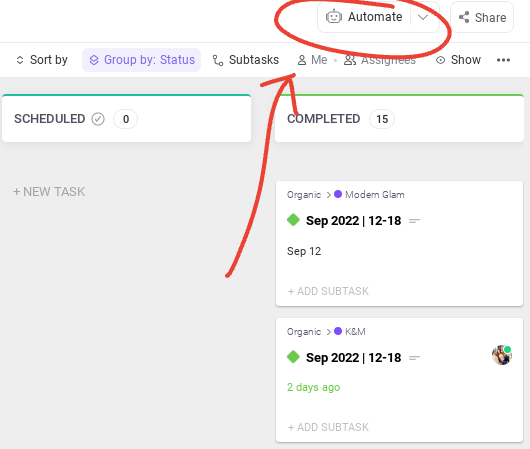
ClickUp task automations
In Create Custom Automation, click ‘When the status changes from Any to’, select ‘Images for Approval’ in the Active status, and click Confirm. I have myself added, and then I’m going to change the due date. I’m going to choose ‘Days after trigger’ to the number two, and click ‘Create’.
I’m not going to turn that one on because if you grab this Pinterest System template, I don’t want that automation to come over. But that’s all you’ll need to set the automation up for yourself.
Ready to schedule
Once I come in and approve the images, they will hop over to ‘Ready to Schedule’, and the Pinterest assistant will be assigned.
In my agency, we do everything one to two weeks in advance. I’m making the pin plan ten days to two weeks ahead of the following month. The graphic designer makes images the week before they need to be scheduled. That way, there’s time for edits to be made.
RELATED: I Tested Pinterest Approved Schedulers So You Don’t Have To
Edits needed
If I come across some images that need to be edited, the text overlay is wrong, the graphics are bad, and something is not working with that design, I’ll put it back into the ‘Edits Needed’. The process will revert back to ‘Images in Progress’ as that task status.
Once the pins have been moved from ‘Ready to Schedule’ to ‘Pins Scheduled’, it means that the Pinterest manager has scheduled them, and they need to be approved. I need to look at the Tailwind and Planoly queue and ensure everything looks OK there. Then I can go ahead and mark this task as done.
In most cases, I don’t need to look at the scheduled pins. I created this particular status because I just recently onboarded a new Pinterest manager, and I wanted to ensure that I’m looking at those to give any critical feedback. It’s constructive criticism that I need for that Pinterest manager to make sure that they are succeeding. So eventually, this status will go away.
RELATED: Manual Pinning Strategy vs Scheduled Pinning Using Tailwind
Complete
Once everything has made its way through, marked as complete, and gone out of this list, it will always live in ‘Complete’. We can always go back and find anything. However, at the end of every month, I archive all the tasks in this column so we can start afresh.
Creating a Pin Plan in your Pinterest client management system
Let’s talk about how to create your Pin plan so that you can go and set this up for yourself. My pin plans for clients are recurring. To create the next month’s, I will open the task, copy and paste the naming convention that lives in the description, and paste it in for four subtasks. Then when I hit save, it creates all the pin plans within each subtask.
Watch the video tutorial to see exactly what it looks like, but here’s my best description. Let’s say you have a number of URLs to create pins for. You can go back to that main level task, and bulk move them out to regular tasks. I would move those out of the ‘Pin Plan Ready’ into ‘Pins for Scheduling’.
Then when you mark a task as complete, it will automatically come back into that task later because of the recurring due date.
So, for example, in the video tutorial, I’ve got three tasks in the ‘Pin Plan Ready’. Let’s pretend that these images are done and are ready for approval. After I come in and approve those, this task would be marked as ‘Done’ and will come back with this recurring due date for the following month.
RELATED: Create a Pinterest Marketing Plan in 5 Easy Steps
Pin Plan Scheduling Details
Everything is planned in one task with four sub-tasks. The subtasks have each pin URL for each week. Those subtasks are then renamed for the appropriate week of the month. So, for example, I would rename these to Client X, or use whatever naming convention makes sense for you. Then we can quickly see what week of the month we need to start these on. The due date will be set for the first day those pins will need to be scheduled.
Since we work in advance, there should never be an empty queue. We should never be missing content. We can pick up our pin scheduling on the date those pins are due. If you want to work even further in advance, you can do that. If you want to work with this workflow where you’re working one week in advance, you can do that. It will all depend on how much workload you need to shift into this system and work in advance.
When I first created this Pinterest client management system for my agency, it took me probably three weeks of consistently working day after day to get caught up and to get us working in advance. Now that we are ahead, I find that I’m in this a lot less often, and I can go back to the things in my business that need my attention.
RELATED: Steal the Full Marketing Process of My Pinterest Agency
Pin Plan Implementation Benefits
All of this was born from the fact that I lost both of my Pinterest managers at the same time in June, and I had to replace them in July. I needed:
- a better way to pull myself out of the day-to-day implementation
- to get myself back into creating content for my YouTube channel and my membership academy
- a way to get my blog posts up on time
- get tasks to my team that they’ve been begging me for
- and find new clients for my business
But to do that, I had to completely gut the inner workings of my Pinterest organic workflow system and rebuild it from the ground up. That is what you are seeing here today.
I want it to be completely transparent in how much time I spend on my organic clients. Now, this is just working on this piece. This isn’t working on all of the other things.
Estimated times for using my Pinterest client management system
Creating a pin plan per client generally takes me about one hour per month. Within that Pin plan creation, I am putting it all into ClickUp, writing text overlays for the graphic designer, and creating, downloading, and repurposing Instagram reels for the Pinterest managers to use in those pin plans.
Our graphic designer takes about one hour per month to create the pins for clients. Everything for each client that she will wors on is templated. So all she has to do is take the images from the blog posts or videos we’re giving her, plug them into the template, put the text overlay on, make sure it has a logo or website on it, and then that’s it. That’s all she has to do.
Approvals take me roughly 30 minutes a week. That is split between approving the images, assigning them to Pinterest managers, and looking at the actual Tailwind or Planoly cues to ensure that content is scheduled and ready to go.
The next one will be skewed because I am no longer a Pinterest manager. I’m not scheduling organic client content for anyone but one client. It takes me about one hour to 90 minutes per week to schedule and make all the content ready to go. This includes writing pin titles and descriptions, ensuring that the idea pins are repurposed into video pins, and ensuring the idea pins are uploaded and scheduled each month.
This can vary based on the account. We have some accounts that are much more simplistic, and the client makes the pins where we have to schedule them. Then we have accounts that might take us a little bit longer because we make all the images, and now we have to download them and upload them into the scheduler.
I wanted to share the estimated times, so you understand what we are doing inside this same system.
This Pinterest client management system has been such a game changer for my agency. I’m filming this right around mid-August, and I’ve been implementing it since about mid-June. So after two full months of implementation and a month and a half of working with two brand new Pinterest managers inside the system, the only complaint they came to me with was naming each task for the month and the week of the month. For example, August 14 to 20, 2022. That was the only constructive criticism I got with creating this and dumping two new contractors into this system.
Final thoughts on Pinterest Client Management System
If you want to grab this same ClickUp template and the onboarding and the customer database, I have an entire ClickUp for Pinterest Managers mini-course for you. It’s a complete system for:
- writing your SOPs for each client
- making sure their entire strategy is documented
- and making sure that your team is aware of how to do each thing in your client’s accounts and this workflow
If you want the ClickUp template and don’t want to upgrade to the entire mini-course, you can do that too. That’s why I created it both ways. I’m not going to hate on you either way.
To learn more about using ClickUp in your business, head over here and watch my ClickUp playlist. I will see you next week.
Pin It For Later


Heather Farris went to school for accounting and worked for years in banking and finance. After finding all of that entirely too boring she started her first blog in her basement in August of 2016. She has started 3 blogs in the marketing, motherhood and travel niches and used Pinterest to grow them all. She quickly became the go-to Pinterest strategist in her peer circles and has been implementing strategies, driving traffic and sales through organic and paid tactics for her clients. On this blog and her YouTube channel, as a renowned Pinterest marketing expert, she educates the public about clear and transparent marketing strategies to help them to grow on Pinterest and in other places online as a renowned Pinterest marketing expert.
